This article will show you how to setup Google Analytics 4 as well as ecommerce tracking with Google Tag Manager and XTruLink. Google Analytics 4 (also known as GA4) is the next generation of the popular free tool Universal Analytics. It uses a completely different data model as well as new reports, features and a completely redesigned user interface. XTruLink uses the recommended event names for GA4 and sends ecommerce actions like add to cart, product click or purchase through our GA4 container template.
If you would like to learn more about the differences between GA4 and Universal Analytics here is a useful resource provided by Google that explains all of the key details.
Step 1: Create your Google Analytics 4 Property
If you already have a Universal Analytics account and need to switch to GA4, then simply go to Admin > Property from within your UA account and select GA4 assistant. The assistant will take you through setup steps similar to those listed below.
To create a GA4 property from scratch (if you do not already have one), visit https://analytics.google.com/analytics/. You will need to have a Google account and be logged in at the time in order to create your property.

Complete the following steps:
- Provide a name for your account, and click next.
- Provide a property name (which will be the name of your website or app) and select a reporting time zone and currency. Then click next.
- Provide relevant business information and click create.
- Accept the data processing terms.
When Step 4 is done, you will reach the Web stream details page where you will be shown your measurement ID. This ID is crucial for setting up your GA4 configuration tag in Google Tag Manager.

Step 2: Create your Google Analytics 4 Configuration Tag
Once you've created your GA4 property you do not need to setup anything additional your GA4 property. When you begin sending data to GA4 it will automatically categorize the ecommerce events and show you the results in monetization reports.
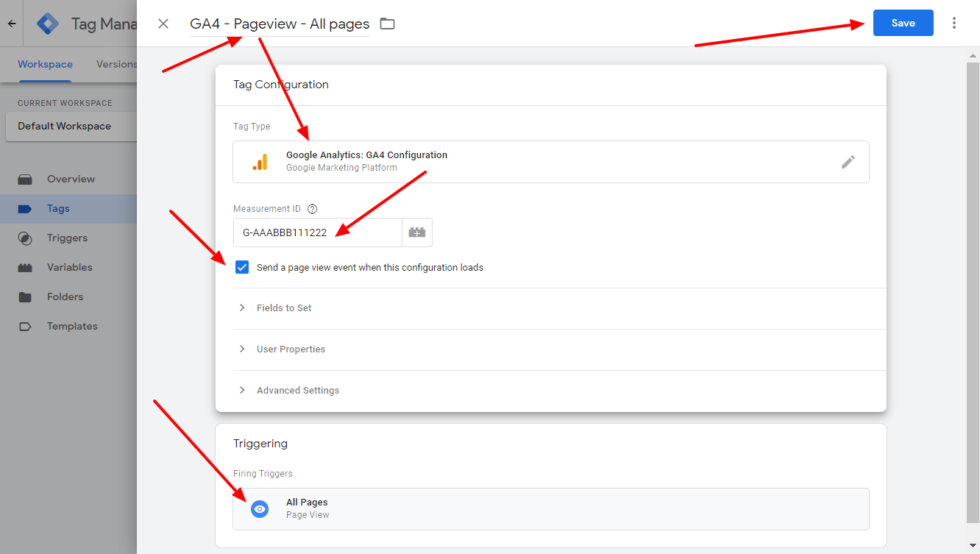
In your Google Tag Manager container, you will first need to add a Google Analytics 4 configuration tag if you haven’t added it yet. This will store your Google Analytics 4 web stream ID (G-XXXXXXXXX) and every global attribute you set in it. It will also send a page_view event if you do not change the default behavior of the tag.

- Start adding a new tag
- Select Google Analytics: GA4 Configuration
- Enter your Google Analytics 4 measurement ID (also known as web stream ID)
- Set your Trigger to Page View > All Pages
- If you are unsure what other options need to be set in this tag, leave everything else in its default state
- Enter a name at the top of the panel (in the example below you see: GA4 – Pageview – All pages
- Save the new tag
Step 3: Import the GTM Google Analytics 4 Container Template
- Download the following Google Tag Manager GA4 Container Template
- On the Google Tag Manager UI, open Admin / Container / Import Container:

- Select the previously downloaded file
- We highly recommend to create a new workspace during the import process (enter a workspace name you wish)
- Select the Merge import option
- To stay on the safe side, select Rename conflicting tags, triggers, and variables
- You should see only “New” items in the summary table. If you see modified or deleted items as well, check the details in consult with a Google Tag Manager expert if needed
- Click the Confirm button to proceed
This import process will create the following new trigger in the workspace:
- Event – Ecommerce Events GA4: it will fire on all ecommerce events in your XTruLink B2C shop
The following variables will be created:
- Ecommerce: helper variable to pull the most recent ecommerce data from the data layer
- Ecommerce Items: returns the most recent product data in the data layer. You can use this variable in a Google Ads Remarketing tag to populate dynamic remarketing data
- Ecommerce Transaction ID: the order ID on the order received page. You can use this variable in other tags where you need to transmit the ID of the order just placed on your site
- Ecommerce Value: the total value of the order on the order received page. You can use this variable in other tags where you need to transmit the value of the order just placed on your site
- Ecommerce Tax: the total tax value of the order on the order received page
- Ecommerce Affiliation: usually empty, could include any affiliate partner name in the future
- Ecommerce Shipping: the total shipping cost of the order on the order received page
- Ecommerce Coupon: it includes all coupon codes in a comma separated list that has been redeemed during checkout (variable populated only on the order received page)
- Ecommerce Currency: the currency used in the last ecommerce action. You can use this variable in other tags where you need to transmit the currency of the order just placed on your site
The following tag will be created:
- GA4 – Event – Ecommerce events: fires using the trigger described above, uses the event name of the last ecommerce action using the recommended retail event names of Google. Includes all the required ecommerce parameters using the variables listed above
Step 4: Complete the newly created Ecommerce Event Tag

- In Step 2, you either already had a “Google Analyitcs 4: GA4 configuration tag” or you created it while going through the steps
- Open the “GA4 – Event – Ecommerce events” tag that has been just created in Step 3
- Open the list in the Configuration Tag drop down
- Select your GA4 configuration tag (the name might be different than on the screenshot above)
- Save the changes
Final Step: Update your XTruLink Online Portal Settings
In the XTruLink dashboard, navigate to Online Sales > Web Portal > Integrations. Add your GTM container ID in the box labeled Google Tag Manager Code.
All done!
Please note: If you already have a Google Analytics 4 account set up for your main website, and you would like to set up cross-domain tracking, please contact us at support@xtrulink.com.